5-Minute Rocky Road Fudge

fudge piece
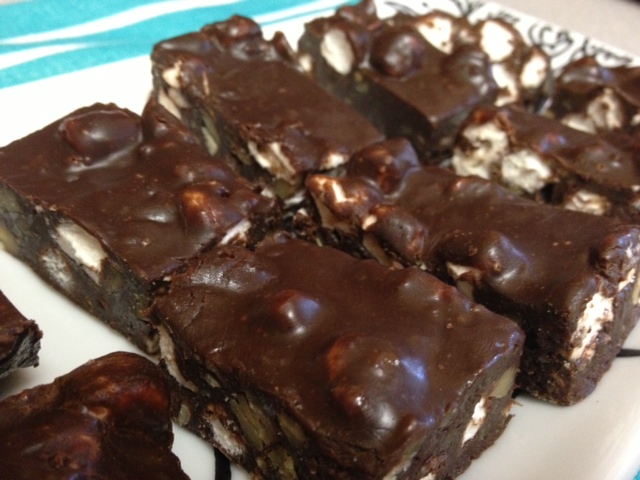
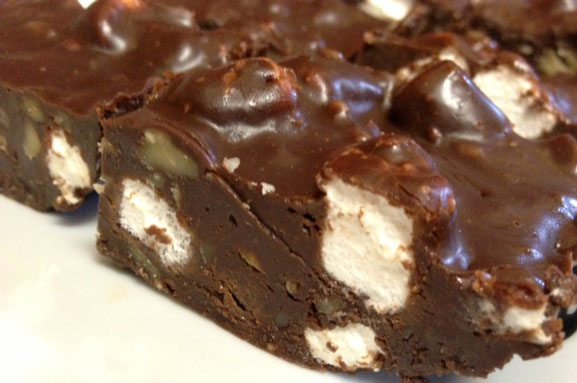
I’ll be honest, I’m not a huge fan of fudge. I find that it’s often either way too rich or way too sweet. All that changed when a friend introduced me to this amazing fudge a few years ago. She was whipping up several batches to mail off to friends and family at Christmas and I happened to stop by at just the right moment. I lent a hand with the fudge factory and was rewarded with a plate to take home. I remember taking that first tentative, teeniest of bites and then proceeded to shove the whole piece into my gob as fast I could get it in there. This isn’t fudge. It’s crack. Holiday crack. It’s smooth rich chocolate is studded with nuts and marshmallows which go together so well that even the pickiest of fudge-eaters are happily brought over to its dark side. Now I’m the one who includes this delicious fudge in my Christmas cookie tins. Just be sure to always set aside a few squares for yourself or pop in the freezer for a rainy day. Did I mention how easy this fudge recipe is? All done in the microwave and prep time is 5 minutes or less!

This recipe was adapted from a NESTLÉ TOLL HOUSE recipe.

Rocky Road Fudge

Ingredients: 

  • 2 cups semi-sweet chocolate chips
  • 1 can (14 oz.) sweetened condensed milk
  • 2 teaspoons vanilla extract
  • 3 cups miniature marshmallows
  • 1 1/2 cups coarsely chopped walnuts or peanuts

Directions: 

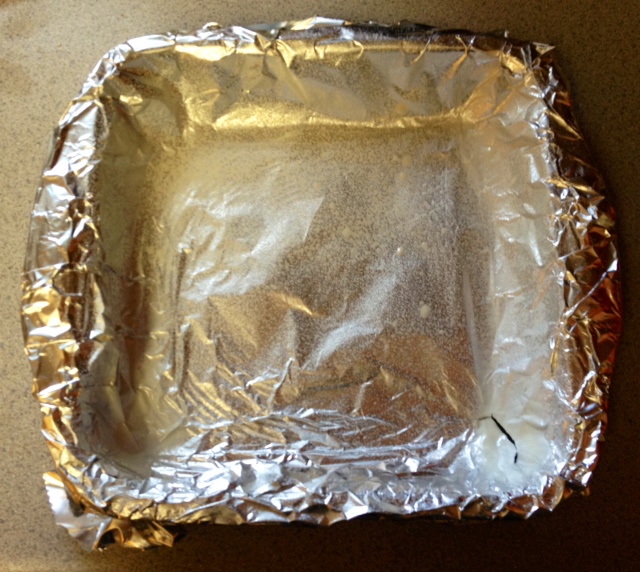
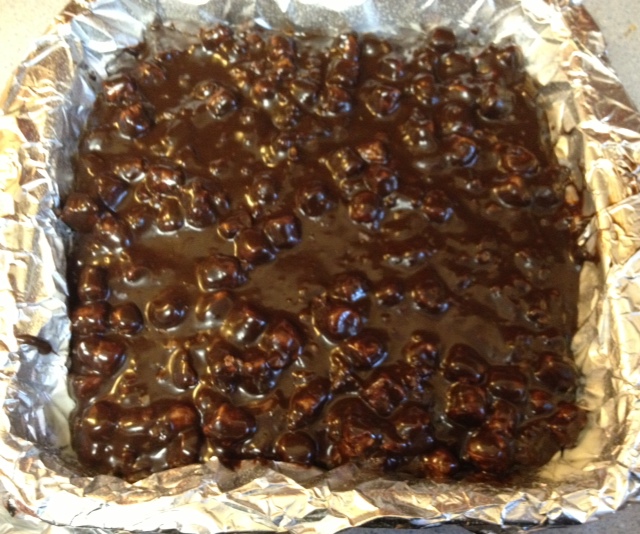
1. Line a 9″ square baking pan with foil and spray with non-stick cooking spray.

image_2

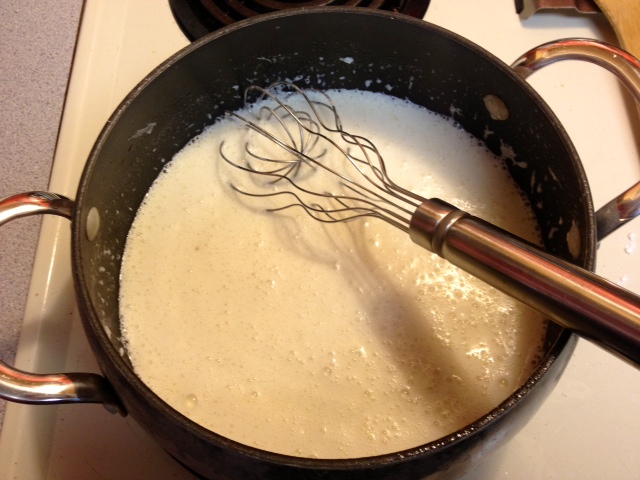
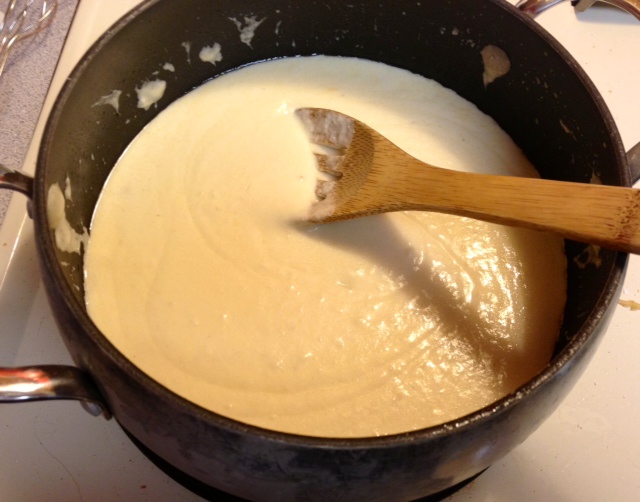
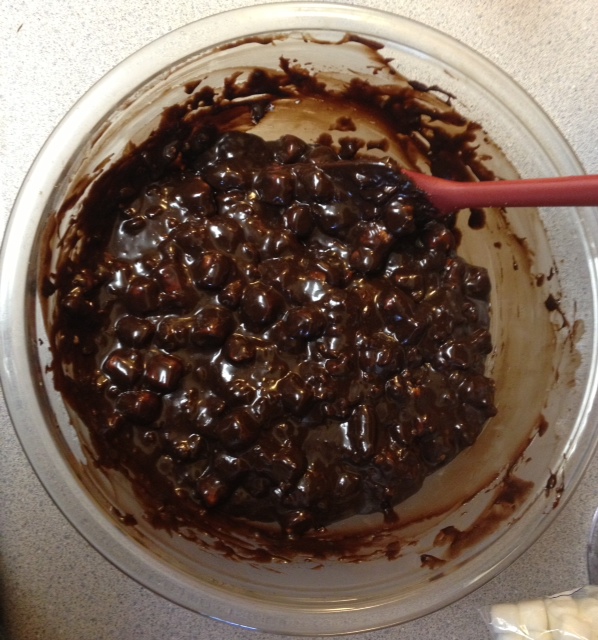
2. In a medium microwave-safe bowl, combine chocolate chips and sweetened condensed milk.

Chips and sweetened condensed milk

3. Microwave for 1 minute and stir. Since microwaves vary, it might be necessary to microwave for 10-15 seconds then stir and repeat as necessary until it’s nice and smooth.

Creamy chocolate

4. Stir in vanilla then fold in marshmallows and nuts.

Marshmallows and nuts stirred in


5. Spread mixture into greased pan and press flat with spatula.

Smoothed mixture into pan


6. Refrigerate for at least 2 hours or until the mixture has hardened. QUICK NOTE: If you’re in a hurry you can also pop the pan in the freezer to help speed it up.

Hardened fudge

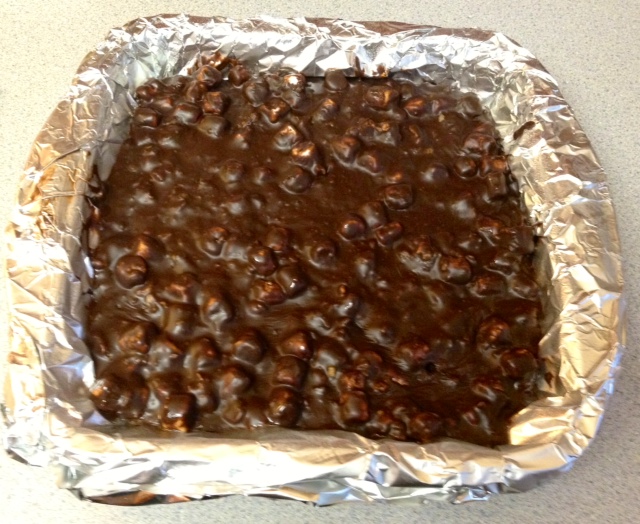
7. Lift foil from pan and use a pizza cutter to cut into small squares. Enjoy!

squares


30-Minute Chicken Alfredo

Chicken AlfredoThis Chicken Alfredo takes the traditional recipe but swaps out the heavy cream with cream cheese, which makes it much easier to prepare at home but, in my opinion, also makes for a richer and creamier sauce. With just a few ingredients needed, this is a great recipe to plan for a weekday meal or last-minute craving. Bonus: It takes less than 30 minutes! 

Easy Chicken Alfredo
Makes 4 Servings

  • 1 tablespoon extra virgin olive oil
  • 1 pound boneless, skinless chicken breasts, cubed
  • 1/2 cup butter
  • 8 ounces cream cheese, softened
  • 2 cups milk
  • 4 cloves garlic, minced
  • 1 cup Parmesan cheese
  • Ground black pepper to taste
  • 1/2 pound of fettuccini, linguine, or spaghetti cooked to al dente (prepare while cooking your sauce)
  • *Fresh basil or parsley (Optional for garnishing)

Directions: 

1. In a pan on medium-high heat, sauté chicken in olive oil until no longer pink. Set aside.
Cooking Chicken

2. Using the same pan, melt butter on medium heat. Add the cream cheese and whisk together. Don’t worry if it looks lumpy or watery.

Cream Cheese & Butter

3. Add the milk and garlic and whisk well, making sure there aren’t any lumps for 2-3 minutes.

Cream Cheese added

4. Whisk in Parmesan cheese and black pepper. Sauce will thicken quickly so once you reach desired thickness (just a few minutes), remove from heat.

Thickened sauce

5. Add chicken and stir to combine. I also add in fresh basil as well for a little color but that’s optional.

Chicken & Sauce

6. Toss chicken Alfredo sauce with cooked al dente pasta, garnish with optional parsley or basil and serve.

Chicken Alfredo

See Also:
Easy Chicken Parmesan
Pizzeria Garlic Knots

Copycat Cinnabon Cinnamon Bun Rolls

Cinnamon RollTo me, Cinnabon cinnamon bun rolls go hand-in-hand with flying and airports. There’s something about the stress of flying that just melts away with that first bite of ooey-gooey-goodnesss of one of their cinnamon rolls. I honestly think more peace treaties would be signed if Mrs. Cinnabon showed up with a tray of these babies. Unfortunately, I can’t have them unless I am travelling since there aren’t any Cinnabon stores in Charleston. Not to fear! A copycat recipe to the rescue. I’ve made this recipe about a dozen times and have never not had at least one person beg for the recipe and/or tell me that the dang thing was literally the best cinnamon roll they’d ever eaten. So instead of being a copycat recipe, it might actually beat the Cinnabon brand but you be the judge. This copycat recipe is from Todd Wilbur’s Top Secret Recipes Cookbook with a few modifications. I’ve also included directions for using either a bread machine or making by hand.

Copycat Cinnabon Cinnamon Bun Rolls
Makes approximately 2 dozen cinnamon rolls

Dough: 

  • 1 cup warm milk
  • 1 package active dry yeast (2 1/2 teaspoons)
  • 2 eggs
  • 1/3 cup butter, melted
  • 4 cups bread flour (bread flour works best but I’ve used all purpose in a pinch and they still turn out great)
  • 1 teaspoon salt
  • 1/2 cup white sugar

Filling: 

  • 1 cup brown sugar, packed
  • 2 1/2 tablespoons ground cinnamon
  • 1/3 cup butter, softened

Icing: 

  • 1 (8 ounce) package cream cheese, softened
  • 1/4 cup butter, softened
  • 2 cups confectioners’ sugar
  • 1 teaspoon vanilla extract
  • 1/2 teaspoon lemon juice
  • 1/8 teaspoon salt

Directions: 

1. BREAD MACHINE METHOD: Dissolve yeast and warm milk. Dump rest of ingredients into your bread machine. Create a little well in the center and pour in yeast milk. Start the dough setting on your bread machine.

Ingredients in Bread Machine

1. BY-HAND METHOD: In a large bowl, dissolve the yeast in warm milk and let sit for 5 minutes to allow yeast to activate. Add the sugar, margarine, salt, and eggs and mix well. Add flour in gradually and mix well. Flour your hands and knead the dough into a large ball. Put in a greased bowl, cover and let rise in a warm place about 1 hour, or until doubled in size.

2. After dough has finished rising, roll out on a lightly floured surface. Helpful Tip: You’ll need a large area so I always clear off and scrub an entire counter top in my little kitchen to work on. Roll out to approximately 21×16″.

Ball of Dough


Rolled out dough

3. Now it’s time to fill the dough! Pour the melted butter over the dough and sprinkle brown sugar and cinnamon on top or the butter. Use a fork or spatula and sort of swirl the three together to combine a bit. FYI, I’ve tried combining in a bowl first and while it’s less messy the filling basically turns into a sticky paste and doesn’t spread well.

Filling on dough

4. Roll up dough and filling from the longest end closest to you up to the end furthest away from you.

Rolling up dough

Using a knife or pizza cutter, cut 1 1/2″ slices and place on a greased baking sheet. If you want more rolls then cut thinner slices or if you want giant rolls cut thicker slices. Just be sure to watch them while they’re in the oven as it will impact baking time.

Cutting rolls

Sliced rolls on pan

5. Cover cinnamon rolls and allow to rise, almost doubling, for 30 minutes to an hour.

6. Preheat oven to 400°F. Once the rolls are done rising, bake in preheated oven for 8-10 minutes or until light golden brown.

Baked cinnamon rolls

7. While rolls are cooling, mix together icing ingredients.

Mixed Icing ingredients

8. Spread over the warm cinnamon rolls and enjoy!

Iced Cinnamon Rolls

Hello World! We come to bring you peace and yumminess.

Cinnamon Roll

These are great eaten right away or reheated later. Just zap in the microwave for 10-20 seconds and enjoy!

Easy Chicken Parmesan

I must have some Italian ancestry somewhere because I have a serious love for Italian food. Seriously…I buy garlic in bulk and I usually cook for two. 🙂

Italian Food Addiction: Exhibit A

Italian Food Addiction: Exhibit A

That being said, as much as I love Italian food it can take time and isn’t always realistic after a long day. That’s why I love shortcut recipes that still pack a lot of Italian punch, such as this Easy Chicken Parmesan. It has all the flavors of of a traditional Chicken Parmesan without all the fuss. You also only need one skillet for the dish and one pot for boiling your pasta. Being able to get such a hearty and tasty dinner on the table in 30 minutes makes this my go-to Italian meal for busy weekdays. Facile e Delizioso!

Picture of Skillet Chicken Parmesan

Skillet Chicken Parmesan
Serves 4

Ingredients: 

  • 1 egg, beaten
  • 1 teaspoon Italian seasoning
  • 1 cup Panco breadcrumbs
  • 2 tablespoons grated Parmesan cheese (the powdered kind works great!)
  • 1 pound of boneless skinless chicken breasts or tenderloin strips
  • 3 tablespoons extra virgin olive oil
  • 1 medium onion, diced
  • 4 cloves garlic, minced
  • 1 large jar (26-28 ounces) of your favorite pasta sauce
  • Salt and pepper to taste
  • 1 pound of spaghetti or substitute for your favorite pasta, cooked al dente
  • 1 cup mozzarella, shredded

Directions: 

1. In a shallow dish or bowl (large enough to dunk the raw chicken into), beat the egg and set aside. In another shallow dish or bowl, combine the Italian seasoning, breadcrumbs, and Parmesan cheese, and set aside.

Helpful Hint: Any time I batter and fry, I set up a little workstation from left to right, with the hot pan as the last station on the right. I also use my left hand for handling the wet ingredients—picking up the chicken, dunking the chicken in the egg, etc.—and my right hand for handling the dry—scooping breadcrumbs over the eggy chicken, and finally picking up the breaded now-dry chicken and placing in the pan. This keeps mess to a minimum and ensures you have one gooey-free hand instead of two.

Raw chicken, egg, and breadcrumbs frying station

2. Heat your skillet to medium-high heat and add olive oil. If you’re working in batches due to the size of your pan, divvy up the olive oil accordingly. Dredge the chicken into the egg and coat generously in the breadcrumbs and cook for 2-3 minutes per side or until no longer pink in the middle. Cooking time may vary depending on the thickness of the breasts so be sure to test. Remove cooked chicken from pan and place on a plate lined with paper towels.

Frying Chicken

3. Using the same skillet you used for the chicken, sauté onion in the hot pan for several minutes. Add garlic and sauté an additional minute or so.

Garlic & Onions sauteing

Reduce heat to low and add jar of pasta sauce and stir.

Note: Have some mushrooms or peppers sitting around and needing a good home? Feel free to throw them into the skillet when sautéing your onions. This is a very versatile dish and great for using up leftover veggies!

4. Place cooked chicken on top of the sauce and sprinkle with Mozzarella cheese. Cover pan to let cheese melt (2-3 minutes).

Melted Cheese over Chicken

Serve sauce and chicken over your favorite pasta and dig in! You might also like to try with my awesome Pizzeria Garlic Knots!

Picture of Skillet Chicken Parmesan

This recipe is so good that it instantly turns on full throttle pug manipulation.

Picture of Buddy begging for Chicken Parmesan

Buddy prays I made enough Chicken Parmesan for him.

See Also: Pizzeria Garlic Knots


4th of July Poke Cake

Final Cake

With 4th of July just around the corner, I thought it would be fun to take a spin on the traditional poke cake and make it a little more patriotic. Poke cake’s are very easy and great for hot summer days. They involve baking a cake from a box, poking holes all over the cake, pouring jell-o all over the cake, and chilling it in the fridge for a few hours. You can use pretty much any kind of cake mix and jell-o flavor so it’s easy to mix it up and have fun with it. The result is so yummy and since the cake is nice and chilly it is so refreshing after a long day in the heat.

NOTE: This cake is super simple but does take several hours for the jell-o to chill so plan to make in the morning or a day ahead of time.

Ingredients:

  • 1 white cake mix (And ingredients to prepare the boxed cake, which is typically egg whites, vegetable oil, and water)
  • 1 pint blueberries
  • 1 small box strawberry jell-o
  • 1 cup boiling water
  • 1/2 cup cold water
  • 1 8 oz. tub Cool Whip
  • 1 16 ounce container strawberries

Directions: 

1. Prepare cake mix according to the directions and pour batter into pan. Sprinkle with blueberries, reserving a handful for the “stars” in the the flag. Bake cake according to directions on box.

Blueberry Batter

2.  After cake has cooled for 15 minutes, take the end of a round spatula and poke holes all over the cake. (I don’t suggest using a fork. That’s what I did the first time and the jello didn’t spread evenly).

Poked Cake

3. In a small bowl, mix jell-o with hot water. Add cold water and stir. Pour all over cake. Chill for 3 hours.

Jello on cake

4. Set aside several strawberries for your flag (about 1 cup). In a food processor or blender,   purée remaining strawberries. Spread evenly over the cake.

Strawberry over cake

5. Slice remaining strawberries thinly. Frost cake with Cool Whip and using remaining blueberries and strawberry slices, decorate cake as an American flag, using blueberries for the “stars” and strawberry slices as the “stripes”.

Final Cake

Happy 4th of July!

Final Slice

Pizzeria Garlic Knots

Plated Knots

I love baking garlic bread to go along Italian dishes and these homemade garlic knots are my favorite. They’re very simple, kids love to help with knotting the dough, and they taste just as good as any Italian restaurant or pizzeria’s garlic bread and tons better than the frozen stuff. They also make a great appetizer when served with marinara for dipping. Warning: these disappear quickly so consider a double or triple batch. 🙂

I’ve included both the bread machine and by hand directions below.

Pizzeria Garlic Knots
Makes 24 knots

Dough:

  • 3/4 cup warm water
  • 1 packet active dry yeast
  • 1 3/4 cups bread flour
  • 1 tablespoon olive oil
  • 1 teaspoon salt
  • 1 teaspoon dry Italian seasoning
  • 1 tablespoon sugar

Garlic Butter

  • 4 tablespoons butter
  • 4 cloves garlic, minced
  • 1/4 cup parsley, finely chopped
  • 1 teaspoon salt

Bread Machine Directions:

If using a bread machine, add the ingredients as recommended by your bread machine and set to dough setting. Continue with “Making the knots” (below):

Risen dough

By Hand Directions: 

In a small bowl, add the warm water and sugar and mix. Add the yeast and let rest for 5 minutes. In a large bowl, whisk together flour, olive oil, salt, and Italian seasoning. Make a small well in the center of the four mixture and pour in the yeast water. Mix and then knead together for 5-10 minutes. Form the dough into a ball, lightly coat with olive oil, and place in a covered dish to allow to rise (approximately 1 1/2 hours).

Making the knots: 

After your dough has finished rising, grab a handful of dough at a time and roll out on a floured surface. Roll to a small rectangle, about 4 inches long and 1/2 an inch thick.

Rolled dough

Using a pizza cutter, make 1 inch strips.

Strips

Take each strip and tie to make a knot.

Knotting


Knotted

Lay on a greased baking tray and leave plenty of space in between so that the knots can rise a second time.

Knots on a tray

Cover pan of knots with seran wrapped sprayed with olive oil and let rise until doubled in size (about two hours).

Second rise

After knots have finished rising, preheat oven to 400°F.

Remove seran wrap and bake knots for 12 minutes or until golden brown. Remove from oven to cool.

Browned knots

While knots are cooling, melt the butter in a medium saucepan and add garlic. Heat on low for 2-3 minutes then add salt and parsley and remove from heat.

Garlic Butter

Generously brush garlic butter onto the still warm knots. I just pile all the finished knots onto one tray and brush away.

Garlic Brushing

Enjoy!

Plated Knots

Crock Pot Steak Stroganoff

FinisheddIf you own a crock pot and are short on time then you’re going to love, love, love this recipe for easy Steak Stroganoff. I threw it together one morning when I was rushing to get out the door and had maybe 10 minutes to prep everything. I just dumped it all in my crock pot and flew out the door. When I came home that evening I was shocked and amazed at how good it turned out. When I say good, I mean really stinkin’ good! Tom kept saying over and over again, “Honey, this is amazing!” and all but licked his plate clean.
This is also a very economical meal! By using cube steak, a cheaper cut of meat, you save a bundle and the crock pot magically transforms this tougher cut of meat it into a melt-in-your-mouth delicious steak which your guests will swear was a Choice cut.

Crock Pot Steak Stroganoff
Serves 6-8

  • 2 pounds cube steak
  • 8 ounces sliced fresh mushrooms
  • 1 medium onion, sliced
  • 1 packet dry onion soup mix
  • 1 packet dry mushroom beef soup mix
  • 1 large can (26 ounce) cream of mushroom soup
  • 1 cup water
  • 3/4 cup sour cream

Instructions:

1. Place the steak in the bottom of the crock pot.

Raw Steak

2. Layer sliced onions and mushrooms on top of meat.
3. In a medium bowl, mix together the dried soup mixes, cream of mushroom soup, and water. Pour over meat, mushrooms, and onions.

Sauce


Pour over meat

4. Turn on crock pot and set for 8 hours on Low or 4-5 hours on High.
5. When read to serve, turn off crock pot and stir in sour cream.

Finished

6. Serve over rice, boiled potatoes, or egg noodles. Enjoy!

Finished

Reuben Ring

My Dad and I were chatting the other day about favorite family recipes and my Mom’s Reuben Ring came up. We immediately started reminiscing about that delicious recipe my Mom discovered at a Pampered Chef party she went to. It has all the amazing flavors of a Reuben sandwich—corned beef, tangy thousand island dressing, and sauerkraut—but instead of plain bread it’s wrapped up in a flakey crust. There was even one hot summer night where several families met at a musical in the park and my Mom baked and carefully transported a Reuben ring for dinner in the park. We remembered it tasting better than ever before and being gobbled up in no time at all. Some recipes have a wonderful way of becoming family memories and my Mom’s Reuben Ring is certainly one of them! Here is her adapted recipe originally created by The Pampered Chef.

Reuben Ring

Reuben Ring

Ingredients: 

  • 3/4 cup thousand island dressing
  • 4 ounces cream cheese, softened
  • 2 cups sliced deli corned beef, chopped
  • 1 (11 ounce) can sauerkraut, drained (Make sure to squeeze out any excess liquid)
  • 1 1/2 cups Swiss cheese, shredded (reserve 1/2 cup for sprinkling on top prior to baking)
  • 3 tablespoons fresh parsley, chopped
  • 1 teaspoon garlic powder
  • 1/2 teaspoon salt
  • 1/4 teaspoon pepper
  • 2 (8 ounce) cans crescent rolls
  • 1 egg, beaten

Directions

Preheat oven to 375°F.

In a medium bowl, mix together cream cheese and thousand island dressing.

Thousand Island

Add the corned beef, sauerkraut, 1 cup of Swiss cheese, parsley, garlic powder, salt, and pepper. Mix together until evenly blended. Set aside.

Filling Mixture

Spray a baking sheet with non-stick spray. To create the ring, I suggest laying a small bowl in the center of the baking sheet to use as a guide.

Cereal Bowl


Remove crescent rolls from package and separate into triangles. Lay 8 of the triangles around the bowl with the base of the triangle laid along the bowl and the points of the triangle going outward.

First layer of triangles


Take the remaining 8 triangles and lay in between the triangles.

2nd layer of triangles


Remove the bowl and spoon the filling mixture along the thick interior.

Filling laid out


Fold the points over and pinch on to the inside of the ring.

Ring


Brush with the beaten egg, sprinkle remaining 1/2 cup of cheese on top, and bake for 25-30 minutes or until the crescent dough is golden and crispy.

Reuben Ring

Now that looks pretty enough to hang on your door…or eat for dinner! 😛

Reuben Ring

Dark Chocolate Cherry Oatmeal Cookies

If you like chewy oatmeal cookies then you’ll love this recipe which incorporates dark chocolate chips, dried cherries, and walnuts. The flavors work really well together and make for a very tasty cookie!

Plated Cookies

Dark Chocolate Cherry Oatmeal Cookies
Makes 2 dozen cookies

Ingredients:

  • 1/2 cup butter, softened
  • 1/4 cup white sugar
  • 1/2 cup packed dark brown sugar
  • 1 eggs
  • 2 teaspoons vanilla extract
  • 2/3 cup all-purpose flour
  • 1/2 teaspoon baking soda
  • 1/2 teaspoon salt
  • 1 & 2/3 cups quick-cooking oats
  • 3/4 cup chopped walnuts
  • 1/2 cup dark chocolate chips
  • 1/2 cup dried cherries

Directions:

Preheat oven to 325°F.

In a medium bowl, cream together the sugars and butter.

Sugar and butter

Add egg and vanilla and beat. Whisk in flour, baking soda, and salt and beat until well blended.

Blended Dough

Stir in the oats, walnuts, chocolate chips and cherries.

Finished Dough

Using a cookie scoop or a large spoon, scoop spoonfuls of cookie dough onto a greased cookie sheet.

Cookies on cookie sheet

Bake for 13 minutes or until cookies are chewy in the center and crispy on the edges.

Note: With any cookie recipe, I strongly recommend you bake one cookie all by itself to test out the exact baking time for your oven. It’s a lot better to pitch one burnt cookie than an entire pan. I’ve learned this lesson the hard way!

Plated Cookies

Lemon Shrimp Linguine

This recipe pushes all the right flavor buttonslemon, garlic, herbs, and buttery shrimp with just a hint of heat. It comes together very quickly and is on the table in no time. This refreshing shrimp pasta is perfect for a date night in or for sharing with guests over a bottle of wine and some crusty garlic bread.

Plated Lemon Shrimp Linguine

Lemon Shrimp Linguine
Serves 2

Ingredients:

  • 9 ounces linguine
  • 2 tablespoons olive oil
  • ½ cup diced onion
  • 4 garlic cloves, minced
  • 4 tablespoons butter
  • 1 pound uncooked medium shrimp, peeled, devained, and rinsed (If you don’t have fresh then frozen is also totally fine. Just be sure it’s thawed before adding.)
  • 1 cup Italian parsley, roughly chopped
  • 3 lemons, zested and juiced
  • 1 teaspoon salt
  • ½ teaspoon pepper
  • ½ teaspoon red pepper flakes
  • 1 cup freshly grated Parmesan cheese

Directions:

Bring a large pot of salted water to a boil. Add the linguine and cook until al dente. Drain pasta, reserving 1 cup of liquid.

In a skillet over medium-high heat, sauté onion and garlic in olive oil for several minutes, until softened. Add butter and ¾ cups of parsley and heat until  butter is melted.

Garlic, onion, parsley

Add shrimp and sauté for 3-5 minutes or until shrimp is cooked.

Shrimp

Add cooked pasta and pasta water and toss.

Add water

Add lemon juice and zest, salt, pepper, red pepper flakes, and ¾ cups of Parmesan cheese and toss until well incorporated.

Lemon Zest

Lemon Zest and juice

Serve onto two large plates and garnish with remaining parsley and Parmesan.

Plated Lemon Shrimp Linguine